COVID-19 and Grok Learning

The COVID-19 pandemic has challenged many teachers including me with shifting from face-to-face on-campus teaching to an off-campus combination of synchronous and asynchronous learning. I thought I’d do my bit for the computing teachers community by sharing my resources.

My first (hoping to share more) installment is for IST. This one is for my year 9s for the Internet and Web Development option. I always run this unit in line with Grok Learning Web.Comp. That it suits off-campus learning is a bonus. Thank you Grok Learning!!!

The Task

In groups of 3, students will design and develop interactive websites. There are deliverables for the team as well as team members. They all have to do Web.Comp to upskill and then apply immediately to their project. Here’s the complete task including schedule and rubric mapped to outcomes (see below). I keep my rubric simple with specific criteria on what I’m looking for.

[embeddoc url=”https://malyn.edublogs.org/files/2020/04/2020-9IST-Task-2-Web-Design.pdf” width=”75%” download=”all” viewer=”google” ]


In groups

  • Choose their own topic inspired by pages from our school diary. It covers study skills, well-being, school history. This content is relevant more than ever and I do not have to worry about allocating time for research which really isn’t the focus of my assessment.
  • Choose their own audience; specific is best, e.g. year 9 student who loves checklist
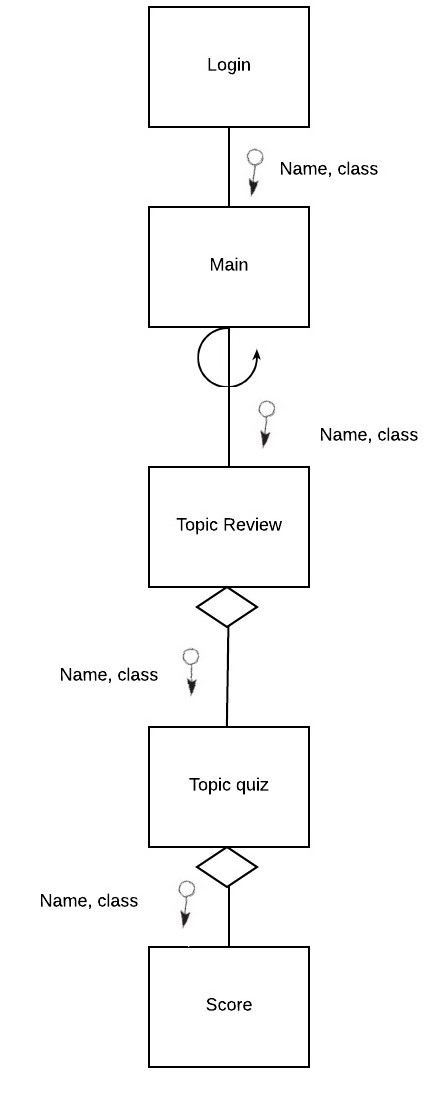
  • Decide on a Site Map, i.e. what pages and features to include
  • Decide on a joint Style Guide

Individually

  • Find their own inspiration before contributing back to the team
  • Define one success criterion based on the Web Content Accessibility Guidelines (WCAG); #a11y is a thing! and a practical way of engaging with ethical issues
  • Create a prototype so they can refine their Style Guides prior to submission – and see the cascading bit on CSS in action (and likely frustration but that’s all part of learning!)
  • Log progress (Medals and Missions) for self-regulation purposes as well as to help me keep track of their progress (evidence of engagement and understanding, in teacher-speak)


a bit more context

I’ve asked my students to do Grok Learning’s Intro to HTML/CSS course late last term. Most have done about 50% of the course and all of them are familiar with the interface. This is why I chose Advanced stream.

My off-campus classroom is in Microsoft Teams, with a channel for Virtual Lessons. This worked well at the end of last term. Now, I’ve added breakout channels (this post from Alice Leung is helpful if you want to learn how I set it up plus a few other tips there) for each project team as I intended this task to be group work. I considered using GitHub but since I haven’t walked my students through setting it up – and I’m not all that confident in trouble-shooting, I decided to stick to files in Teams. I’ll have to show them how to sync so they can do offline development.

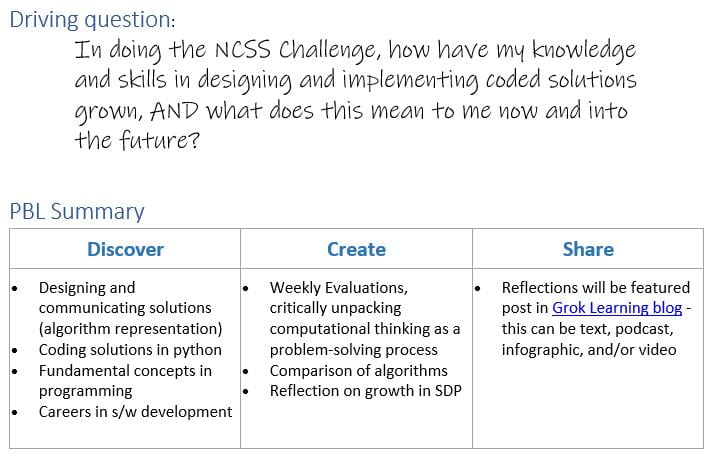
I usually do backward-planning, i.e. starting from outcomes and then create learning experiences accordingly. Here are the outcomes I intend to assess:

5.2.2 Designs, produces and evaluates appropriate solutions to a range of challenging problems

5.2.3 Critically analyses decision-making processes in a range of information and software solutions

5.3.2 Acquires and manipulates data and information in an ethical manner

5.5.1 Applies collaborative work practices to complete tasks

Here’s my planned Term 2 schedule including weeks before and after the assessment and Web.Comp. Not sure what the NSW plan of staggered return will do to this plan but I think it might just be resilient enough!

[embeddoc url=”https://malyn.edublogs.org/files/2020/04/9IST-Term-2-Schedule.pdf” width=”75%” download=”none” viewer=”google” ]


Old posts that could be useful

Here’s a post I wrote for more on how I use Grok Learning in my teaching. Grok Learning is free until July. That’s another bonus!

Here’s a post on how I do my backward planning – this one’s on a unit for Year 11 Software Design and Development.

PBL with NCSS Challenge from Grok Learning

I am such a big fan of Grok Learning and NCSS Challenge. It’s been an integral part of my teaching Information Software and Technology (IST) since 2013. Every year, the challenge is the foundation of my assessment tasks so my IST Scope and Sequence always has Software Design and Programming in Term 3 when the challenge is on. Though the foundation is the same, each task is different and over the years, I’ve explored many of the features provided. (Read what’s new this year from Grok Learning’s blog).

Apart from enjoying learning fundamentals of programming as well as coding in python, I really want my year 9 IST students to be more aware of, and appreciate:

  • growth in their learning
  • diversity in solutions
  • personal relevance of computational thinking and coding

In other words, I want deeper learning. I decided to plan this slightly differently using my two go-to PBL-planning frameworks (1) student-friendly format from Bianca and Lee Hewes, and (2) teacher-programming familiar format from Setting the Standard for PBL: A Proven Approach to Rigorous Classroom Instruction.  This is a similar approach to another unit I loved – Delta X (my X + CS project with year 11 Software Design class).

In doing the NCSS Challenge, how have my knowledge and skills in designing and implementing coded solutions grown, AND what does this mean to me now and into the future?

Thank you Grok Learning for agreeing to feature my students’ work, providing an authentic audience 🙂


I’ve not had a chance to make it all pretty. I decided to share now in case others doing the challenge are looking for ideas to use it in their assessments this term. I’m using a class OneNote notebook (I’m also a big OneNote fan) but have PDF’d relevant details, including literacy/writing scaffolds, to share as well. The textbook referred to here is by David Grover et al, it is a good reference to augment the notes from the challenge, and it aligns well with NSW’s syllabus.

[embeddoc url=”https://malyn.edublogs.org/files/2019/07/2019-9IST-NCSS-Challenge-plan.pdf” download=”all” viewer=”google” ]


I think it’s pretty self-contained but happy to clarify if needed.

Suggestions for improvement are also welcome! Even if it’s too late for me to change this year, there’s always next year 🙂


PBL to learn JavaScript

I’ve been meaning to learn JavaScript but always fall flat largely due to the good ol’ lack of time. Really though, I think it’s because learning a new programming language is overwhelming – there’s so much to learn and some resources can even make pros like Brad Post feel like an idiot. And yet, I normally send off my computing students to do tutorials. The irony!

Anyway, I decided that the best way for ME to learn JS is to force me to dive right in with a project. Not totally for selfish reasons, actually, as I think my students would benefit from learning it too. Many of my year 11 Software (SDD) students can program in python (thank you Grok Learning) and a few can do java (thank you FRC). While many can also write HTML/CSS (thank you again Grok Learning), none would own up to knowing JavasScript. We could all be beginners!!

So I launched a PBL with the driving question “Can we do better than the textbook?” (There are several PBL models but I love, love, love the Hewes’ version – check it out). My students and I will learn JS and SDD topics to create a website with topic pages and interactive review pages. There will be only one site for the two classes so the product – and code libraries – will be shared. Additionally, this PBL helps exercise effective learning strategies (The Learning Scientists), e.g. elaboration, concrete examples and dual coding for creating the topic pages and retrieval practice, interleaving, and spaced practice for completing the quizzes.

The plan is to learn/discover, create and share with purpose.

Model the system

Because the site is a software system in its own right, I modeled it using the systems modeling tools in the SDD syllabus. I believe modeling is a good teaching technique and certainly good experience for my students to use models generated by others.

Not only would they learn JS, they’re going to live the syllabus in an authentic way. Oh the questions! Rich as…as I showed them the models including the storyboard and structure chart below  (click to enlarge and thank you lucidchart)- these 2 diagrams on a recent assessment task gave many students grief.

Our site would start off with the Hardware and Software topics so I could allocate one each, with one to spare for me. It’s easy for them to research and there’s loads of multimedia resources as well. We have two weeks to do this.


Storyboard

Storyboard

Structure Chart

Structure Chart

Model the learning

When I launched this PBL to the class, I also showed my rather ugly login and menu screens – a student quipped, “I can see why you’re a computing teacher and not an art teacher“. Ha! I actually styled it better by next lesson. Also, the pseudo-login (no cookies just parameter passing via JS) did not work which I owned up to as something I was still working on (it sort of works now).

In fact, this was what I planned for students to do, i.e. focus first on their HTML content and then style later, insisting on a separate CSS file. And I also planned to introduce JS once they’ve handed in drafts of their topic pages.

Learning with the kids (Kids are awesome)

I was alone in settling for an ugly page initially because they soon went off playing with their CSS files. They went off exploring various HTML tags and CSS styles in ways I could not have predicted.

  • There’s this super-quiet kid who I gave a shout-out because he was doing gradients and image blurs via CSS (I didn’t know it could!) – while a couple was doing that in PhotoShop (what is it with kids and gradients????). Anyway, that opened the gates for wider sharing in the class…not something I anticipated, silly me.
  • And then there’s this kid who said he had no programming experience and there he was with JS script to load date and time. He wanted them to display on one line  but my CSS inline-block technique suggestion failed. I did know about string concatenation so we solved his problem via JS – will be sharing that with the rest of the class next week…it’s legit syllabus content.
  • There’s another kid who worked pretty quickly so I suggested animated asides. Rather than going for a CSS solution, he’s decided to do it via JS …with image blur to boot, because he’s found out from a peer. I’ll be sharing all that with the rest of the class next week.
  • There’s another kid who insisted on animating a shape so it ‘bounced’ left to right…whatever for, who knows?! This algorithm makes use of flags, functions and several control structures they have to learn – will be sharing that with the rest of the class next week.

In fact, several students have already incorporated JS into their code, problem-solving with me and peers as they went along.  Here I was with my contrived pseudo-login to provide a JS problem to solve yet they were soon busy finding/creating their own problems. I’ve got loads of examples from students now.

So yeah, I was learning with them.

It’s not an assessment

A week in and a week to go, the  task is not over and I’ve only got their draft HTML/CSS – reluctantly submitted as still being rough – or empty (but stylish). I can tell students are engaged. I can tell they’re keen to learn and are learning….together…with me.

This is not an assessment…at least not a formal one. It is a rich source of formative assessment  though, even for me.  Like Bianca Hewes said, PBLs are “a busy, complex, yet organised ecosystem of learning“.

I’m cool with that 🙂


Aside: I use my blog for my own reference and to help me remember, I often link to resources used as I’ve blogged them in context. I’m adding here a really useful resource Brad Frost (mentioned above) shared about writing kinder and more helpful technical documentation created by Jennifer Lyn Parsons. This’ll come in handy when we get to that part of the syllabus!

Get these 5 right for better oral presentations

The year 11 Software Design & Dev PBL Delta X was to culminate with a pitch presentation to a panel of judges. As part of the project, I gave the students an opportunity to present just to assess their presentation skills. While I had a few who came across as confident and prepared, the majority were not.  I was very lucky to get Melissa Pye, an advertising/startup pitch specialist, come and do a workshop with my students before the pitch.

Melissa went through the steps of creating a pitch deck – the “pitch in a nutshell” which really emphasised elements of the PBL giving it more authenticity. I loved that she mentioned the importance of understanding the problem including audience and purpose as well as how designed solutions can help make it easy, faster and/or cheaper.

Melissa also went through 5 elements to consider when actually delivering the presentation. I believe that these are really useful for all types of presentation, including delivering instruction …meaning, it’s also useful for teachers like me. Here are the 5 elements and a bit more blurb about what Melissa said and did.

5_PresentationElements

Mindset

Think positive. Think confident. Think authentic. Think passionate.

Melissa reminded us about being prepared including anticipating questions. Having done the prep work, the next bit is to trust in this prep that the presentation will go well.

Body Language

Be big and open – stand with legs apart, back straight, arms on the side not crossed. Use open palm instead of pointing finger. Look at the audience (look at noses or foreheads if you struggle with eye contact).

Melissa got each student to stand up and say something. In this way, she was able to provide individual constructive feedback, much needed by many of my students. To one student self-conscious about being over 6-foot tall, she said “You’re lucky you’re tall. Be tall.” It’s pretty amazing how much ‘presence’ can be evoked with appropriate body language.

Voice

Vary pitch (lower pitch is preferred), volume and speed. Variety adds interest.

Again, after modelling, Melissa gave each student individual feedback. She was able to draw out impressive volume from 2 of my quietest students. This was amazing to watch and the transformation is palpable.

Words

Use succinct, positive and confident words. Technical jargon is not necessarily a no-no as it can indicate specialist knowledge.

Melissa emphasised the need to choose appropriate words and phrases. Practice. Practice. Practice. Practice saying the words you will say.

Pause

Use pause before or after a key point to emphasise it.

Melissa modelled this to great effect.


I’m happy to report that my students employed what they learned in this workshop. Their pitch presentations were so much better than the trial presentations. It was so good, I was gushing (haha).

Anyway, developing oral presentation skills is important and the above are good pointers to help teachers help/teach students. I highly recommend practice sessions and giving students specific feedback just like Melissa did. Another useful post is by Erik Palmer in BIE (Buck Institute for Education), “Speaking Matters! Improving Project Presentations“.

Delta X

I’ve been mulling about what to do with my year 11 software (SDD) students for their 2nd project/assessment task. Apart from the syllabus outcomes, I wanted one of the outcomes to be an appreciation of how technology can be transformative and that they themselves can create such technology.

Enter CS + X, except I inverted it to X + CS. While this may be irrelevant from a maths perspective (commutative property of addition), it captures better my pitch of “what is a problem (X) that can be ameliorated with the addition of computer science (CS) ?” In other words:

X + CS = Δ X

Another outcome I wanted is to highlight the importance of understanding the problem as a premise for designing solutions….way before coding/programming comes into the picture. This gave birth to the focus question for the next project, i.e.

Is your software design worth developing?

When planning out the details of this project-based learning unit, I found the book “Setting the Standard for PBL” invaluable.  In particular, Figure 5.3 (pp  118-119) Project Design: Student Learning Guide (Sample) was incredibly helpful. In a nutshell, here were my steps:

  1. List the outcomes for assessment (based on planned Assessment Grid)
  2. Outline the syllabus content (based on planned Scope & Sequence)
  3. Define the Final Products and marking/weighting
  4. Identify instructional strategies

Here’s what I’ve got (PDF) [embeddoc url=”https://malyn.edublogs.org/files/2016/05/11SDD-Project2-2fb4goq.pdf” download=”all” viewer=”google”]

Here’s a student-friendly version

2016 11SDD Project2

I also created a Project Calendar which will be the basis of my students’ Gannt charts for their own projects.

From here, creating the Assessment notification was fairly straightforward with only the rubric for the Final Products left to define.

As luck would have it, I scored us free entry (thank you Google) into The Sunrise Alpha conference. It will feature successful Australian startup founders. I’m hoping this excursion on Monday will inspire my students to see that they too can be part of this.

I’m also negotiating to have mentors from UNSW School of IT. (I am very lucky!)

Finally, I got several staff members to be part of the panel to whom my students will pitch their ideas. The panel will judge whether or not the problem is worth solving and if the recommended solution is indeed viable and worth developing….fodder for next project 🙂

Of course, this is just the beginning of the story.

Tomorrow, we start in earnest. I’ve told my students about the project and we’ve already started brainstorming about ideas on problems to solve. This will have to be bedded down more when I they meet their teams…tomorrow.