the beginnings
Ever since I saw the Lilypad Arduino at a CS4HS workshop at UNSW, I was quite taken by the possibilities for making wearable technology – blending my 2 current teaching foci of computing and textiles. We got our own kits as well as primers at the CS4HS workshop and I was buzzing with excitement about it at school. My TAS boss was just as thrilled, seeing more STEM opportunities particularly for HSC D&T MDPs and set me off on a mini-shopping spree at Sparkfun electronics. I showed some of these goodies to the 2 HSC DT classes and even though many were excited about the idea, only 1 actually considered creating wearable technology. Still, there’s 1!!!
Of course, there’s a wide gap between possibilities and reality and I soon had to face up to creating a prototype. At which point, busyness, end-of-year exhaustion and so on got in the way of inspiration. I had none!
project 1
Fortunately, an opportunity – need, even – came up with a fairy party (for an 18 year old, no less) and the birthday girl (a daughter’s friend) was keen to have some electronics on her costume. This was the simplest of circuits using only a battery pack and a string of LED lights. We didn’t use all 10m of it so I’ve got a bit left over which can be used when I can get the right resistor for it. Really basic stuff but the lights blink so it looked cool.
project 2
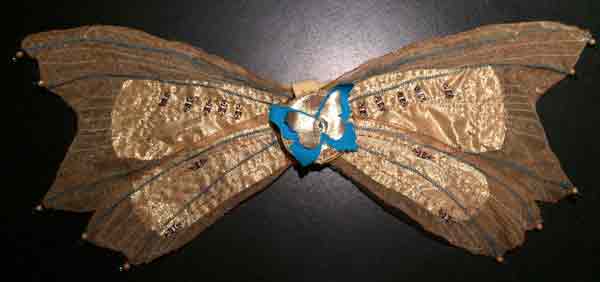
Getting a little bit more confident about playing with e-textiles, I decided to make fairy wings for my daughter who’s attending the party as well. I made the wings based on this tutorial. This shows that I’m really an electronics n00b because I wasn’t really thinking about the wires used which really made designing/sewing the circuitry more complicated than necessary, i.e. I had to avoid the wires (conductive, yes?). Anyway….
Another thing that made it a bit harder for this n00b was that I wanted a row of lights to light up. All the beginner tutorials I looked at only had 1 light. You know the feeling when you don’t know enough to even ask Google? Yes, that. Anyway, I finally stumbled on a basic explanation of parallel and series circuits and I was on my way (btw, this circuit tutorial from Sparkfun is even better; I wish I saw it earlier). Basically, I wanted a couple of parallel circuits (+ to +, – to -) for a symmetrical design.
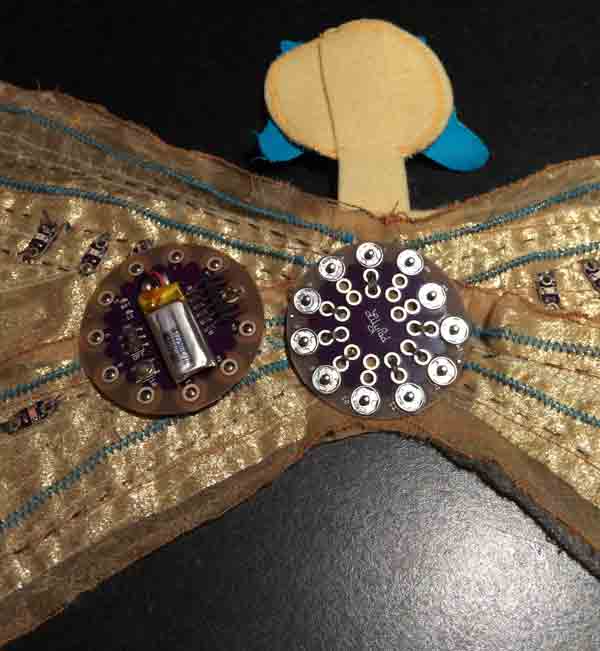
The materials I used were all Lilypad stuff from SparkFun: SimpleSnap, SimpleSnap protoboard, 2 rainbow LED strips and conductive thread. I also used the FTDI from my original ProtoSnap kit to program the system; it doesn’t come with the SimpleSnap.
I had trouble positioning the protoboard on the wings as I wanted to make it ‘easy’ to access the negative (-) pin on both sides. I also wanted to eventually add sensors using the analog input pins. I had so many questions on how to assemble my circuits and in the end, decided for a prototyping approach. That is, I sew one circuit on, program and test. Sew another circuit on, program and test. etc. This worked and got me going. There’s a lesson right there!
When stitching, I avoided the wires on the wings by positioning them at the back and “crossing” them at the front (the intervening textile layer is enough). There are other ways, I was told, but this worked enough for me. I also learned that I don’t have to stitch all the way to the (-) pin except for the first one, i.e. The (-) circuit is one “circle” in and of itself. One of the tutorials suggested to sketch the stitching or circuits first, i.e. plan. In hindsight, I really should have. There’s a lesson right there, too!
Stitching the circuit was an exercise in balancing form and function. Stitches had to work to operate the lights as well as look good. To work, I had to ensure there’s enough contact with the right pins as well as avoid crossing over existing circuits and the wireframe of the wings. I also had to tidy up lose ends which could accidentally touch another circuit.
I kept the programming simple as the party was looming and I had no time to learn enough C to make it more fancy. I wanted a finished product!
Attaching the wings to the costume and covering the main board proved challenging as well. I guess, I really didn’t think through the details of the final design from the beginning. There’s a lesson right there yet again!
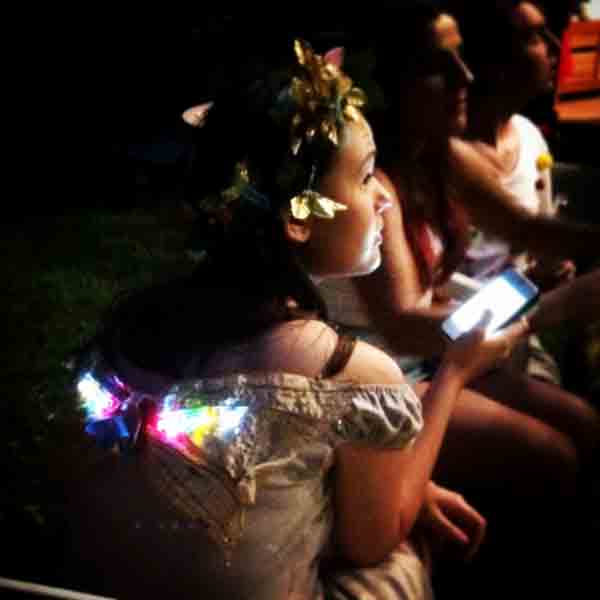
However, it all came together in the end and the wings worked…and it was an amazing fairy party. I also have a working prototype to show students as well as play with. What was a mere possibility months ago is now an evolving reality.
I’ve learned so much. I have wings. I will fly. 🙂
click photos to enlarge – you’ll have a closer look of the pins used…and my sewing

(video of wings – mov)

This is a great post Malyn and on a topic (Arduino) I am starting to explore. Here is alink to a recent article I found: https://learn.sparkfun.com/tutorials/insulation-techniques-for-e-textiles
Awesome link, Tim! I didn’t think about textile movement at all – lucky, I didn’t have to with the wings.
There’s something cool about the exposed ‘wiring’ as such but I will definitely consider insulation with future projects as there will indeed be future projects.
I’m not yet sure how far into Arduino I’ll go into. I’m quite happy with my IST program (without it) for now. We’re looking at applications in DT instead, especially for MDPs. Watch this space … or better yet, come visit! We should discuss some possible collaborative projects.